Saturday, February 4, 2012

My Guinea Pig

I have been watching a friend's almost five-year old daughter a few days a month for the last two month. She is a VERY active and bright young lady with an incredible imagination. She is very independent, but I find that our days are much smoother if we have some structured activities and "school-work" at some point.

I started out just printing off coloring pages for her, but quickly got caught up in Pinterest and have found some wonderful teaching and homeschool sites! Right now my two favorites are: 1+1+1=1 and Confessions of a Homeschooler. There is so much out there though. I will do my very best to link up to my resources so that you can access them too. Plus, giving credit where credit is due is just the right thing to do!

We are working through a Valentine's Day unit right now that I will be sharing very soon.  Stay tuned!

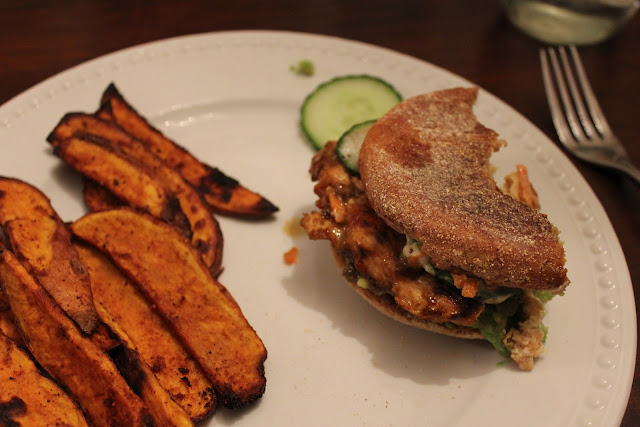
Wasabi Salmon Burgers & Sweet Potato Oven Fries

Great. Now I'm hungry!


I was so impressed with this recipe! I didn't think Abby would like the soy-wasabi glaze, so I left it off of hers. She can't seem to make up her mind about salmon - she either loves it or hates it. She didn't care for her plain patty, but with a little of that glaze she gobbled it right up! Greg said they were "really good" and if you know my husband you know what a compliment that is! You can also tell a recipe is really good if I don't get a picture of it before we start eating!

I served these burgers on lightly toasted whole wheat English muffins with shredded carrots, sliced cucumbers, mashed avocado, and wasabi mayo and sweet potato fries on the side.  You could also serve it as a wrap or on a salad with mixed greens, carrots, radishes and sprouts.
Wasabi Salmon Burgers
From Eating Well:  June/July 2005, The Eating Well Healthy in a Hurry Cookbook (2006)

    2 Tbsp reduced-sodium soy sauce (or 1 1/2 Tbsp regular soy sauce and 1/2 Tbsp water)
    1 1/2 teaspoons wasabi powder
    1/2 teaspoon honey
    1 pound salmon fillet, skinne
    2 scallions, finely chopped
    1 egg, lightly beaten
    2 tablespoons minced peeled fresh ginger
    1 teaspoon toasted sesame oil

Whisk soy sauce, wasabi powder and honey in a small bowl until smooth. Set aside.

With a large chef's knife, chop salmon using quick, even, straight-up-and-down motions (do not rock the knife through the fish or it will turn mushy). Continue chopping, rotating the knife, until you have a mass of roughly 1/4-inch pieces. (You could also pulse a few times in your food processor if you're lucky enough to have one!) Transfer to a large bowl. Add scallions, egg, ginger and oil; stir to combine. Form the mixture into 4 patties. The mixture will be moist and loose, but holds together nicely once the first side is cooked.

Coat a large nonstick skillet with cooking spray and heat over medium heat for 1 minute. Add the patties and cook for 4 minutes. Turn and continue to cook until firm and fragrant, about 3 minutes. Spoon the reserved wasabi glaze evenly over the burgers and cook for 15 seconds more. Serve immediately.


Sweet Potato Oven Fries
I have no idea where this recipe is from. I sent my husband searching for it, so I'd guess AllRecipes or something like that.

    2 medium-sized sweet potatoes, rinsed and dried
    2 Tbsp. vegetable oil
    2 tsp. smoked paprika
    1 tsp. coarse salt
    1 tsp. garlic powder
    1 tsp. freshly-cracked black pepper
    1/2 tsp. cumin
    1/4 tsp. cayenne (optional)

Preheat the oven to 450 degrees.

Carefully cut the potatoes into 1/4″ thin strips, or to your desired thickness and length.  Then place in a large bowl, and toss with the remaining ingredients (oil and spices) until potatoes are evenly coated.

Then spread out the potatoes evenly on a baking sheet prepared with parchment paper or silicone baking sheet. Try not to overcrowd the sheet, or have multiple layers of fries — you want them to be roasted, not steamed. DO NOT attempt to get away with not lining your baking sheet. You will be so, so sorry!

Place in oven and cook for 20-25 minutes, turning the fries once or twice during that time to cook evenly.  (May take more or less time, depending on the size and thickness you cut the fries.)  Remove once the edges slightly begin to brown and fries begin to crisp.

Saturday, January 14, 2012

Getting it Together - Part II

Getting back into substitute teaching and sitting my friend's four and a half year old have made me realize just how disorganized my life is. I would come home from a day of subbing and still have cleaning to do because 1) my husband is blind to dirt (as I have been told all men are), and 2) I didn't explicitly tell him what needed to be done. To his credit, he did get a lot done after I brought the problem to his attention. Even still, I started looking into chore charts and didn't really find anything that fit our needs, so I made one and this is the near end result...
The asterisks indicate things that may or may not need to be done, but need to be checked on a daily or weekly basis. I made the chart to fit into an 8x10 picture frame so that it will be dry erase in it's finish product. I originally had square boxes to check off when a chore had been completed, but changed to spaces so that I could assign daily chores with initials and monthly, quarterly, and annual chores could be dated so I know when they were last done. I hope that this chart will eliminate some of the boring communication between Greg and me so that we have more time for other things. I am excited to see how it works!

Thursday, January 12, 2012

Getting it Together

It seems as if Abby's interests and intellectual needs have been changing so quickly that I'm barely able to get things together to head in one direction and she's already going in another. I realized that I needed to get things more organized and make our home more functional for her learning. I am noticing that the things I have done to our space are part Montessori and part OCD. Either way, I'd say things are improving!

I have been looking for a small and attractive coat rack to hang at Abby's level so that she can be responsible for getting her own coat before an outing and hanging it up when we return. I haven't been able to find one that I liked enough to pay the asking price for and haven't had the time to add it to the Honey-Do list. I was shopping for craft supplies when I ran across this wire coat hanger at the Dollar Tree. It's not as attractive as I would have liked for it to be, but it allows for Abby to be more independent and I'd call that a dollar well spent.

Simple & Cheap. Pretty much sums me up!
Abby has recently started pulling all of her toys out and dumping all of her bins out until there is no room to play, let alone even walk through the living room, so in the interest of preserving my sanity I created labels for her bins and shelves. I chose to use a font that is simple, clear, and similar to fonts used in beginning printing lessons and because Abby can't read yet I also wanted to include pictures of the toys. If you would like a pdf of the file I would be glad to email it to you, just leave a comment with your email address in it.

The ideas behind the labels is that she will be better able to take her toys out, play with them, and then return them to their "home" when she is done. It's very important to us that our children learn to treat people and their things with respect, taking care of your belongings is part of that. Today was day one with the laminated labels and here's what I learned...
  1. Adhesive velcro tabs are pretty much useless after they've been toted around and stored in extreme hot and cold temperatures for five years. I will probably be hole-punching the tags for the bins and attaching them to the handles like luggage tags.
  2. Scotch tape is no match for a 21-month old. I was afraid to use stronger tape because I wanted to keep the labels mobile while salvaging the finish on the cheap shelving we have. Still working on a solution for this one.
  3. Abby LOVED knowing what to put where and was so much more excited to help with clean up! Score! Insert Happy Mama Dance Here!
Labels velcroed to bins. Those that are labelled with a STOP sign are materials that require assistance from a parent, such as DVDs, CDs, and special books.
The drawer unit next to her kitchen is new and already well used. It has freed up several fabric bins for other materials and has contained her kitchen mess to a smaller area.
We have been slowly collecting arts and craft supplies for Abby, but haven't really had anywhere in the house to store them which means that every art project, even something as simple as coloring, requires a minimum of two trips out to the garage. That means cold feet and a rush of cold air into the house, which doesn't exactly thrill me. I had been thinking of inexpensive ways to store art supplies in a more accessible way when I ran across the idea of using an over the door shoe organizer. Less than ten dollars? Heck yes!
Please don't look at my pantry. It's embarrassing. Getting that organized is nowhere near the top of my to-do list though, so I guess I ought to accept it the way it is!
I am very pleased with the results and I think Abby is too! In fact, we have been doing so much more painting and coloring lately that we decided to create an area in our dining room to display her artwork. I chose to frame a famous quote by Pablo Picasso and hang a clothes line where art can dry and be displayed in a way that is easy to change out.

Greg says he sees a lot of happy trees.
"Every child is an artist. The problem is how to remain an artist once he grows up." Pablo Picasso
I really struggled with how to arrange, frame, and display the quote. Greg insisted that it needed to be artistic and unconventional, so it is. I guess. It serves its purpose and will probably change before I get used to it, so it'll do for now.

Monday, January 9, 2012

Pumpkin-Maple Sourdough Cake with Carmel Buttercream Frosting


The first helping...

I have been caring for a sourdough started for about six months now and have finally branched out to trying recipes that I would have never associated with sourdough. This was my first dessert sourdough recipe and it killed two birds with one stone. I have a ton of pureed pumpkin in the freezer to use up and was neglecting my sourdough starter in a bad way. I don't remember where I found this recipe, but it's definitely a keeper. If you don't have a sourdough starter at home it's okay. You can come over and I'll give you some of mine or you can visit Sourdough Home for the directions I used to start mine. It's really not as complicated as it sounds. It just takes time, planning and patience. Needless to say, keeping a sourdough starter has been good for me in a number of ways.

This cake is one of those almost healthy desserts - It uses maple syrup, whole wheat flour, and it has vegetables it in! See? I told you it was healthy! Okay, maybe healthy is a bit of a stretch, but it is definitely better for you than lots of other dessert options. It tastes very similar to carrot cake and has a dense and chewy texture that is more like a muffin than cake. There is a very mild sourdough flavor that I found to be very enjoyable. In my limited sourdough experiences, the sourness of the end product continues to develop in the days after baking, but we didn't have a chance to test that. The recipe makes one eight-inch cake, which is just the right amount for a small gathering or for my husband's after dinner snack. I'm not kidding - he ate the entire cake in one evening! Oh ok, I helped. A little. Or maybe a lot. I am almost certain it wouldn't hold up well if you tried to layer them, but prove me wrong if you must.

The frosting recipe can be found in my post for Samoa Cupcakes. I had about a cup of the caramel frosting leftover, so I froze it and used it here. It was a over little sweet for my taste, but the flavors paired well. If I were to make a frosting specifically for this cake, I'd probably opt for a maple glaze or a brown sugar cream cheese frosting.

Pumpkin-Maple Sourdough Cake
1/2 cup pumpkin or squash puree (canned or homemade)
1/2 cup maple syrup
1 egg, lightly beaten
1 teaspoon vanilla extract
1 cup “fed” 100% hydration sourdough starter
3/4 cup whole wheat flour
1/2 teaspoon baking powder
1/2 teaspoon baking soda
1/4 teaspoon salt
heaping 1/2 teaspoon pumpkin pie spice
4 tablespoons unsalted butter, melted

Preheat oven to 400 degrees and move rack to center position.  Butter an 8-inch round cake pan (or coat with baking spray).

Start with all ingredients at room temperature. In a mixing bowl, whisk together squash puree, maple syrup, egg, and vanilla.  Fold sourdough starter into squash mixture into until well combined. In a separate small bowl, whisk together flour, baking powder, soda, salt, and pumpkin pie spice. Add dry ingredients to squash mixture and stir just until incorporated. Stir in melted butter. Pour batter into the greased 8-inch round cake pan.

Bake at 400 degrees for about 25 minutes or until cake springs back when lightly touched.

Tuesday, January 3, 2012

Warning: Husband Cooks Too

Yes, that's right folks. We drink our mimosas from a Mason jar. If that's too country for ya, then ya'll can just go to IHOP!

Happy New Year's everyone! We have never done anything special to ring in the new year at the Baker house, but today we started a new tradition that I am excited to plan and execute in a more fashionable way next year - we had friends over to have New Year's brunch and it was just so much fun!

My husband is not much of a cook, but me oh my can he whip up some crepes! It's his specialty and its always a treat to have him make a meal. We've mastered sweet, fresh fruit fillings for our crepes and decided it was time to venture into the savory category. With the help of Pinterest, we decided to try ham, cheese, and egg crepes. We used our old stand-by recipe for crepes from America's Test Kitchen Family Cookbook - you know the big red one that I use every single day. Best wedding present ever. Anyway... on to the point...

We also tried a new sourdough crepe which was so, so good. There are lots of great site with info on how to start and maintain your own sourdough starter, but if you'd rather bring me a mason jar I'd be glad to pass mine along. The sourdough crepes were delicious with the ham, egg and cheese filling, but I have a hard time imagining them being very good with a sweet filling. Maybe if you add a dash of vanilla and a tablespoon or two of honey to it? Give it a try though and let me know what you think! Here is the recipe for the Sourdough Crepes... please note - this is not my recipe, but I have had it for sometime and don't remember where I got it.


Sourdough Crepes
makes about (9) 10-inch crepes

1 cup sourdough starter (mine is 100% hydration, all whole wheat flour)
3 eggs
3 tablespoons butter, melted
3 pinches of salt
1/4 cup milk (more or less may be needed depending on your sourdough starter)

In a medium size bowl, whisk 3 eggs, 3 tablespoons melted butter, and 3 pinches of salt until combined. Add to this mixture 1 cup of sourdough starter. Stir well.

Add milk slowly until you get a thin batter. Preheat skillet over medium heat for two full minutes, then turn down to low before lightly grease the skillet.

For a 10-inch skillet, pour 1/3 cup of crepe batter into the center of your skillet. If you are using a smaller skillet you will need 1/4 cup of batter. Quickly pick up the skillet and roll the batter towards the outer edges. Put the skillet back on burner and cook until edges are a bit dry and small bubbles dot the surface of the crepe. It may take less than a minute to cook each side of the crepe. Cook times depend on the skillet type, burner heat, and crepe thickness. If you try to flip your crepe and it does not seem ready, let it cook a few moments longer. Flip. The second side will take less time to cook than the first.

Place your crepe on a plate. Make your second crepe. Continue stacking finished crepes until you are ready to serve. Stacking keeps the crepes soft and warm.


If you want to make the ham, cheese and egg filling your process is slightly different. You will need to have a cup or so of finely shredded cheddar cheese, a cup with 4-5 eggs scrambled with a little bit of milk or cream, and deli ham sliced into halves or thirds depending on the size of your pan, prepared and near the stove top. As soon as you flip your crepe you will add about 1/4 cup of scrambled egg on top of the cooked side of the crepe. Place a lid on top and cook for about 1 minute. When the egg is nearly set, sprinkle with cheese and top with ham slices. Cover until cheese is melted, then fold in half, then in half again so you're left with a triangle. These would be awesome with some finely chopped scallions in them or on top for garnish.

They are great hot out of the skillet or at room temperature, so making them up a little in advance for a crowd is no problem. Abby and her 3 year old friend Andrew gobbled these "sandwiches" up, which is awesome because I have a hard time getting her to eat much protein! We experimented with freezing them and were very pleased with the results. We will be making a very large batch in the near future for quick and easy meals or snacks.

I am very much looking forward to having these crepes on my birthday... and on Valentine's Day, Mother's Day, our anniversary, and well pretty much any other time I can persuade my husband to make them again!